
Step-by-Step Home Construction Guide - Part I
Posted by Ward Cedar Log Homes in Log Homes Log Home Construction Guide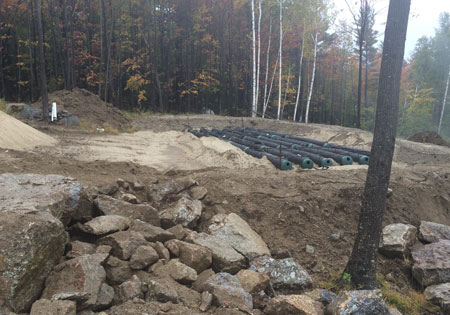
You’ve got big plans for building your dream home, whether it be a log cabin, timber home or hybrid, but where do you begin and what can you expect along the way? Follow along with our step-by-step guide, detailing every aspect of the new home construction process, from prepping your property to move-in day.
(If you’re not ready to talk construction and, instead, need help through the pre-construction phase with choosing a floor plan, securing financing or settling on a log or timber home provider, we can help with that, too.)
Part 1: Preparing Your Property
It’s been said that what you do behind the scenes will determine your success in the spotlight. The same goes for your home. Long before your logs are erected or your timber frame is raised, you’ll set the stage for building success by preparing your home site. After all, a home is only as good as the foundation on which it is built.
Use this handy five-item, site-prep checklist to ensure you’re starting your build strong.
- Hone in on a Home Site: Once you’ve chosen a property for your home (check out our tips here if you’re still on the hunt for The One), you’ll need to narrow down the specific location on the land where you want to place your home. With your county’s permitting requirements in mind, orient your home according to your property’s unique topography, including framing the views and positioning your home in response to the sun’s path and local wind conditions. (When you work with a local Ward Cedar rep, we can assist with this!)
- Clear the Land: After choosing the exact spot where your home will be sited, it’s time to let your excavator lead the way with clearing the land. A 30-foot minimum perimeter around your home is recommended to minimize the fire hazard and maintenance hassles of encroaching brush. (Clearly mark any trees you want to keep!) This space will also ensure plenty of room for staging the building materials.
- Dig a Driveway: Creating an access point to your future home is done by removing topsoil (called “cutting”) to establish a solid foundation for your chosen driveway materials, usually gravel. (If you opt for asphalt, the drive will typically be paved after construction.) Verify that the driveway will be sloped and graded to keep water away from the house and your driveway stays safe in wet and icy weather.
- Set Up the Water Supply: If you will be building on a property without access to city water — as is the case with most log and timber homes — you’ll need to install a working well. An experienced driller will map out a promising spot for your well, then dig to a minimum depth of 100 feet. After drilling, your contractor will install a casing pipe and pump, while the water line to the house will be installed after the foundation is finished.
- Install a Septic System: Anytime connecting to the city sewer isn’t feasible, a septic system will be needed. Selecting a licensed company to install your septic tank is essential. A local contractor will be knowledgeable of the local geological conditions and permitting regulations that can affect the installation process.
With your site prepped, it’s time to move forward on the foundation. Stay tuned for Part 2, Breaking Ground.
Contact us today to begin your log home journey.
Be sure to follow us on Facebook, Pinterest, and Instagram for inspiration, events, tips and more!
Post Your Comment